From Sketch to Masterpiece: Unlocking the Power of Graphite Pencils in Art
When most people think of art supplies, they picture colorful paints, brushes, or even digital tablets. But one of the most timeless and versatile tools of all is also one of the simplest: the humble graphite pencil. Whether you’re sketching in a notebook, shading a realistic portrait, or laying down the foundation for a larger piece, graphite is the backbone of countless artworks.
The beauty of graphite lies in its simplicity. With just a pencil, a piece of paper, and a bit of practice, you can create everything from loose doodles to jaw-dropping masterpieces. This guide will show you how to get started with graphite pencils, why they’re so powerful, and how you can take your pencil drawings to the next level—even if you’re brand new to art.
Why Graphite? The Hidden Power of Simplicity
Graphite pencils have been around since the 1500s, and artists have relied on them ever since. Unlike paints, pastels, or markers, pencils are inexpensive, portable, and forgiving. If you make a mistake, you can simply erase and try again.
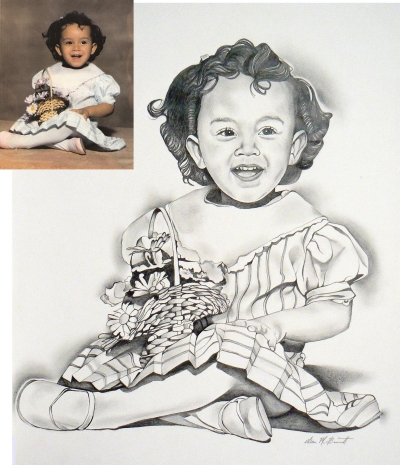
But don’t let their simplicity fool you. Graphite can achieve an incredible range of effects, from the lightest whisper of a sketch line to the darkest, velvety shadows. With practice, a single pencil can produce drawings that look almost photographic.
Beginners love graphite because it’s approachable. Professionals love it because it’s limitless. And that’s what makes it so special.
Getting to know your tools
Before diving in, let’s break down the basics of what you’ll need.
1. Graphite Grades
Not all pencils are created equal. You’ve probably seen letters like HB, 2B, or 4H on pencils—these indicate hardness or softness:
H pencils (Hard): Produce lighter, sharper lines. Great for precise sketches and fine details.
B pencils (Bold/Soft): Create darker, softer marks. Perfect for shading and dramatic contrast.
HB pencils: The middle ground. Great for everyday sketching.
As a beginner, you don’t need every grade. A simple starter set—something like 2H, HB, 2B, 4B, and 6B—will cover most situations.
2. Paper Matters
Smooth paper is best for fine details, while textured paper (often called “tooth”) helps hold darker graphite for rich shading. Try experimenting to see which surface you prefer.
3. Erasers
Erasers aren’t just for fixing mistakes. A kneaded eraser can lift graphite gently to create highlights, while a vinyl eraser gives you clean, sharp corrections.
4. Blending Tools
Blending stumps (or even a tissue or cotton swab) help smooth out graphite for soft gradients and realistic shading.
The Basics of Drawing with Graphite
Now that you’ve got your tools, let’s talk technique.
1. Start Light
Begin with faint, gentle lines. These serve as your framework and can be adjusted easily. Don’t press too hard—you’ll want flexibility as your drawing develops.
2. Think in Shapes
Instead of jumping straight into details, break your subject into basic shapes—circles, rectangles, triangles. For example, a face starts with an oval; eyes can begin as almond shapes. This approach makes complex drawings feel manageable.
3. Build Layers
Graphite shines when you work in layers. Start with light outlines, then gradually add shading and detail. Think of it as sculpting: each layer builds depth and dimension.
4. Control Your Pressure
Light pressure produces delicate lines, while heavier pressure creates bold, dark strokes. Practice shifting between the two to add variety and interest.
5. Blend for Realism
Smooth transitions between light and dark areas make drawings feel more lifelike. Use blending tools, or even your finger (though beware of smudges), to soften graphite where needed.
If there’s one skill that takes graphite art from “nice sketch” to “wow, masterpiece,” it’s shading.
Key Techniques:
Hatching: Parallel lines used to build tone.
Cross-Hatching: Overlapping sets of lines at different angles for darker areas.
Stippling: Tiny dots to create texture.
Smooth Shading: Gradually building layers and blending them for seamless tones.
Understanding light and shadow is crucial. Imagine a strong light shining on your subject—where would the highlights be? Where would the shadows fall? Training your eye to see this will transform your drawings.
Common Beginner Mistakes (and How to Fix Them)
Pressing Too Hard Too Soon → Start light. You can always darken areas later.
Ignoring Proportions → Use guidelines. Compare distances and angles before committing to details.
Over-Blending → Blending is powerful, but too much can flatten your drawing. Keep some texture for interest.
Neglecting Highlights → Highlights are just as important as shadows. Use your eraser as a drawing tool, not just for corrections.
Remember, even the most detailed graphite drawings begin as simple lines and shapes. Every artist—whether famous or just starting—goes through the same process: sketching, refining, shading, and finishing.
What matters most is patience. Masterpieces aren’t created in minutes; they’re built gradually, layer by layer, pencil stroke by pencil stroke.
So, pick up that pencil. Start small. Experiment, make mistakes, and keep going. With time and practice, you’ll discover just how powerful graphite can be.
Final Thoughts
Graphite pencils may be basic tools, but in the hands of a dedicated artist, they can unlock incredible creative potential. From rough sketches to hyper-realistic portraits, graphite offers a world of possibilities—all you need to do is begin.
So next time you sit down with a pencil and paper, remember: you’re not just doodling. You’re laying the groundwork for a masterpiece.
*Some links on this page are affiliate links. I’m a Blick Art Materials affiliate, which means I may earn a small commission if you make a purchase—at no extra cost to you. Thanks so much for your support.

")


")